Best Lighting for Portraits.

The portrait is one of the most personal and revealing subjects you may photograph as a photographer or any creative. Portrait photography, or portraiture, is a type of photography aimed toward capturing the personality of a person or group of people by using effective lighting, backdrops, and poses. A portrait photograph may be artistic or clinical. You can always be a part of the picture without showing your face. Alternatively, you can take a photo of your hands holding an item.

Questions to ask yourself and your client.

Once you decide on what you want to reveal in your portraiture work or what your subject expresses their wishes to you, you can now create your amazing portrait photographs. Do you want to include a full body image of your subject or maybe props/lifestyle setting to reveal your subject’s personality? Do you just include head and shoulders? These are important questions to ask before your photography shoot. 

I always ask my clients if they have a reference image to send to me. Sometimes clients do not express exactly what they desire, verbally. An image or set of images to use as a reference is always a safe bet that there will be harmony on your photography set.

Side Note. Remember that camera lens glass, coupled with new technology for photography creation in your camera body, is much better than years ago. That means your subject will be sharper. Facial lines, acne or scarring, or other facial issues may have your subjects feel uneasy in front of you. You want to make your subjects feel comfortable and relaxed. You also want to use lighting that is softer than harsh light. Most photography is retouched to some degree these days. Use a retoucher or technique that is satisfying to your client. It will go a long way to have a retouching conversation before any photography.


Where to start, in terms, of lighting? Let’s dive in.


1.Natural Light. Natural light can be the most amazing light for any portrait. Even on a grey, overcast day, natural light works so well with any skin tone. Depending on the time of year, your location, and the time of day, natural light can be tricky as much as it can be flattering. Natural light sometimes has color tones that you may have to deal with in post-production. If your subject has deep-set eyes, natural light can make your subject’s eye appear to be black holes. Natural light can be dramatic, with shadows from trees or buildings or natural light can be harsh with sharp shadows on the face, as a summertime session at high noon.

 Study the color of light, photograph different examples, and try your various color settings with your camera.

LRamsay.png
LRamsay.png
Angela3.jpg

My Subject’s eyes seem sunken in with the natural light that is not very bright. It was important to keep the subject as natural as possible, in the natural setting. I did use photoshop to opening up the eye’s exposure.

Macy3.jpg

With this portrait, I took advantage of the bright sun coming through the clouds and creating a sharp shadow for the far side of the face, to add drama. My subject and talked about the mid day harsh lighting and how it would be dramatic on her face. We did a few test images before the final pose.

A reflector works wonders when photographing outdoors. Aim the reflector towards the areas you need more light in. Sometimes, I use a Speedlight for extra fill light. More on that later. 


2. Continuous or Constant Lighting.

This means that when you turn the studio lights on, they stay on – like a video light or a flashlight. You can power them up or down, based on what you need, but they produce what you see is what you get lighting. 

Continuous lighting has made great strides in the quality of light, affordability, and light strength. You want to use continuous lighting that is daylight balanced and has a lot of power and strength. I have had a few subjects tell me they prefer constant light over strobe lighting. The constant light does not make them jumpy or flinch. Not all subjects are comfortable with the constant flashing of strobe lighting. With constant lighting, you can see how the light will fall on your subject and modifier accordingly. 

LRamsay.jpg

LRamsay.jpg

Both of these portraits were created with continuous lighting. While the light is on the flat side, it is still very even and pleasant. I moved the light closer to the subject, for the image on the right, and the light-filled her face and the light fall off from the neck down.


3. Strobe Lighting.

A strobe light or stroboscopic lamp, commonly called a strobe, is a device used to produce regular flashes of light. The light source is commonly a xenon flash lamp, or flash tube, which has a complex spectrum and a color temperature of approximately 5,600 kelvins. To obtain colored light, colored gels may be used.

LRamsay.jpg

I love working with strobe lighting with most of my work. It is crisp, sharp, flattering, and soft, depending on the modifier you use. Strobe lighting is easy to adjust and shape.

With a range of brands for you to choose from, the use is pretty much the same. There are different modifiers to utilize and different brands to mix to adjust your strobe light.

Depending on where the strobe light is: above, to the side or in front, the light quality is sharp and powerful. Shadows are controlled by modifiers and space between the light itself and the subject. Shadows can be deep or softened. Movement is easily photographed with strobe lighting.

With each type of light, you will have to decide which type of light to use: hard light, soft light, specular, and diffused light. Soft light comes from a light source that is large relative to the subject, whereas hard light from one that is small relative to the subject.

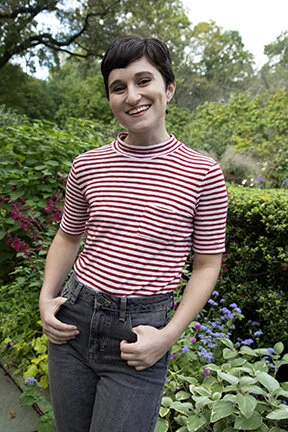
Specular light is a light that retains its reflective qualities. When this light hits a subject, the reflective light bounces back into the camera. The diffuse light is observed when the projected shadow of the subject has blurred edges: this is called a soft shadow. The contrast is also less pronounced, with differences more subtle between bright and dark tones. Example, the soft shadows on the face, closest to the grass. The face and top retain their light reflective quality. Light source is the sun, during summer season.

LRSUMER4.jpg

Tune in next time when I discuss light modifiers and light shaping!