DSLR camera metering for beginners!
The other day, I was teaching a new photography student the concepts of DSLR camera metering. My student was eager to learn how to use different choices and techniques. However, the concept of metering seemed very looming to her. We were walking through a local park and that provided a great canvas for me to explain and teach my student live DSLR camera metering to improve her photography metering skills.
So let’s dive in and talk about photography metering with your DSLR camera.
Using your DSLR camera Meter:
In today’s DSLR’s digital camera world, you can use your camera’s meter or a handheld meter. The digital camera meter is a great tool to help guide you to a great photograph. I explained to my student that with a DSLR camera, your camera meter is top-notch. (and comes in handy if you do not have a handheld light meter.) When you focus your camera with that half push of the shutter, your camera is not only focusing, but it's taking a reading (metering) of the scene. It is measuring how much ambient light is being returned through the lens to the sensor. Depress your shutter halfway and see what exposure your camera reads of the scene.
Now, your exposure triangle (ISO/ASA, shutter speed, and aperture setting), lens choice, lighting that you are photographing in will all come into play.

In photography, through-the-lens (TTL) metering refers to a feature of cameras whereby the intensity of light reflected from the scene is measured through the lens; as opposed to using a separate metering window or external hand-held light meter. In some cameras various TTL metering modes can be selected.

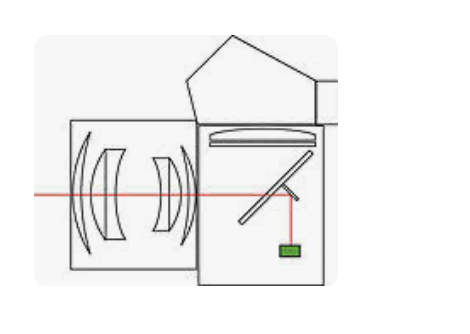
Light enters your camera’s sensor via the camera lens.
If you have a handheld light meter, that type of light reading is called Incident Metering.


Incident metering measures the intensity of light falling on the subject and gives an accurate and consistent rendition of the tonality and contrast regardless of reflectance, background, color, and shape. Subjects that appear lighter than gray will appear lighter. Some photographers will use a grey card or color calibration tool for a more accurate color light reading. Any type of light has a color or tone, along with a color temperature. That is a different subject but another aspect that is very important in producing stunning photography work.

This graphic is an excellent example of the different types of light that you can utilize for your next photography shoot. Understanding the various lighting set-ups will set you apart from other photographers. I say that because you may have different light sources that you may have to use. Shaping light and exposure control for lighting is a highly respected skill and highly sought after from a variety of clients.
Most cameras today have a few basic ways of measuring the incoming light:
Matrix or Evaluative Metering – the camera looks at the light in the entire scene and averages it, (Nikon puts a bigger emphasis on the area where your lens is focused as well). Nikon calls this Matrix Metering, Canon calls it Evaluative.
Center-Weighted Average Metering – looks at the light of the entire scene and averages it, but with emphasis on the center of the frame. Nikon and Canon both call this Center-Weighted Average Metering.
Partial Metering – this measures the light only in a small portion of the center of the frame (about 8-12% of the scene). This is a Canon metering mode, Nikon does not have one similar.
Spot Metering – measures the light only in a small area around the central autofocus point (about 1.5-3% of the frame). Nikon and Canon both call this Spot Metering.
