DSLR camera metering for beginners!
The other day, I was teaching a new photography student the concepts of DSLR camera metering. My student was eager to learn how to use different choices and techniques. However, the concept of metering seemed very looming to her. We were walking through a local park and that provided a great canvas for me to explain and teach my student live DSLR camera metering to improve her photography metering skills.
So let’s dive in and talk about photography metering with your DSLR camera.
Using your DSLR camera Meter:
In today’s DSLR’s digital camera world, you can use your camera’s meter or a handheld meter. The digital camera meter is a great tool to help guide you to a great photograph. I explained to my student that with a DSLR camera, your camera meter is top-notch. (and comes in handy if you do not have a handheld light meter.) When you focus your camera with that half push of the shutter, your camera is not only focusing, but it's taking a reading (metering) of the scene. It is measuring how much ambient light is being returned through the lens to the sensor. Depress your shutter halfway and see what exposure your camera reads of the scene.
Now, your exposure triangle (ISO/ASA, shutter speed, and aperture setting), lens choice, lighting that you are photographing in will all come into play.

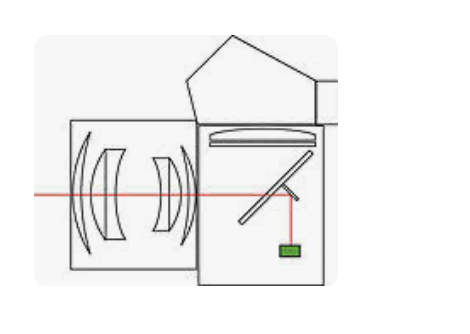
In photography, through-the-lens (TTL) metering refers to a feature of cameras whereby the intensity of light reflected from the scene is measured through the lens; as opposed to using a separate metering window or external hand-held light meter. In some cameras various TTL metering modes can be selected.

Light enters your camera’s sensor via the camera lens.
If you have a handheld light meter, that type of light reading is called Incident Metering.


Incident metering measures the intensity of light falling on the subject and gives an accurate and consistent rendition of the tonality and contrast regardless of reflectance, background, color, and shape. Subjects that appear lighter than gray will appear lighter. Some photographers will use a grey card or color calibration tool for a more accurate color light reading. Any type of light has a color or tone, along with a color temperature. That is a different subject but another aspect that is very important in producing stunning photography work.

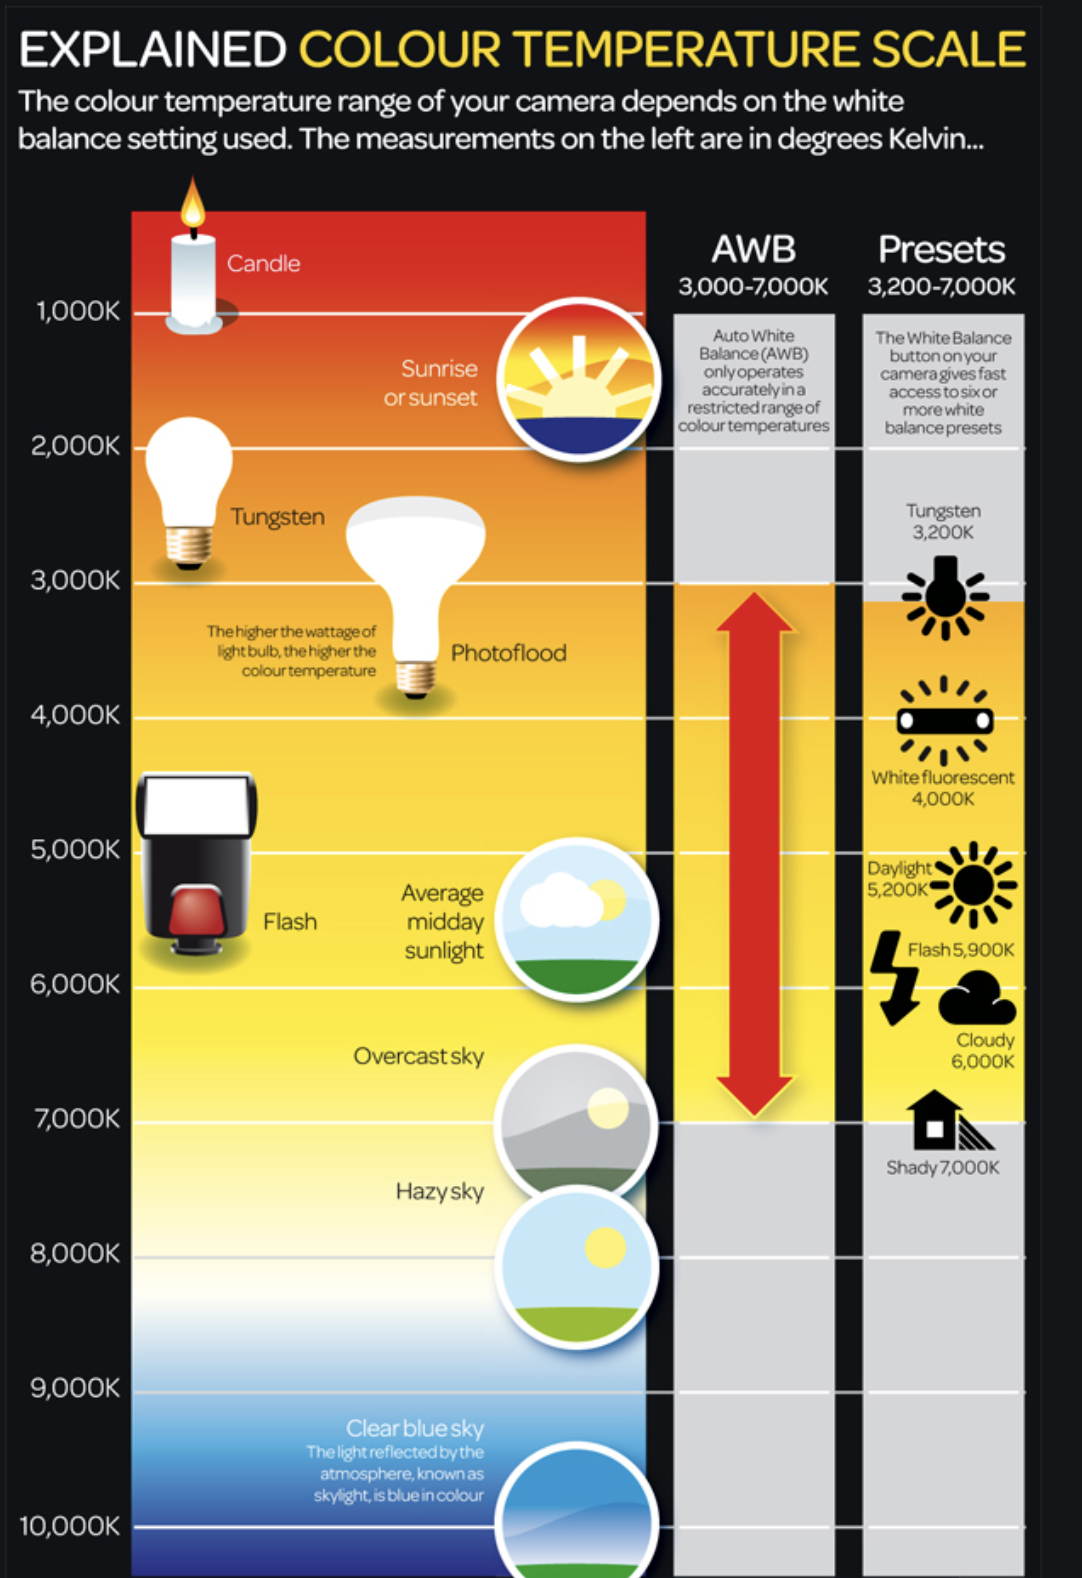
This graphic is an excellent example of the different types of light that you can utilize for your next photography shoot. Understanding the various lighting set-ups will set you apart from other photographers. I say that because you may have different light sources that you may have to use. Shaping light and exposure control for lighting is a highly respected skill and highly sought after from a variety of clients.
Most cameras today have a few basic ways of measuring the incoming light:
Matrix or Evaluative Metering – the camera looks at the light in the entire scene and averages it, (Nikon puts a bigger emphasis on the area where your lens is focused as well). Nikon calls this Matrix Metering, Canon calls it Evaluative.
Center-Weighted Average Metering – looks at the light of the entire scene and averages it, but with emphasis on the center of the frame. Nikon and Canon both call this Center-Weighted Average Metering.
Partial Metering – this measures the light only in a small portion of the center of the frame (about 8-12% of the scene). This is a Canon metering mode, Nikon does not have one similar.
Spot Metering – measures the light only in a small area around the central autofocus point (about 1.5-3% of the frame). Nikon and Canon both call this Spot Metering.

My photography student and I spend an hour in the park trying different DSLR camera metering selections, various natural lighting situations and using the DSLR camera meter for exposure. My student felt she was uncomfortable with metering and understanding the differences at first. The more we practiced and came upon different natural lighting situations, the more my student became comfortable with her metering skills. When we meet up again, I will find out if she put these new photography skills to use with her homework assignment!

Do you challenge yourself, creatively?
Do you challenge yourself, creatively? When you reach a certain level of experience, you form a style and visual voice.
Starting out with my photography career and work as an artist, I experimented with different film types, printing papers, photography styles, equipment, time of day, etc. I studied the masters and the new artists making their art their way. After professionally working for a number of years and gathering clients that seek out my style of creative work, the process of trying something new is pushed to the side (or the back of the room).
On a recent fashion editorial photography shoot, published in ROIDX Magazine, I made the decision to challenge myself with different lighting and photography techniques. Let’s talk about the various creative ways I challenged myself.
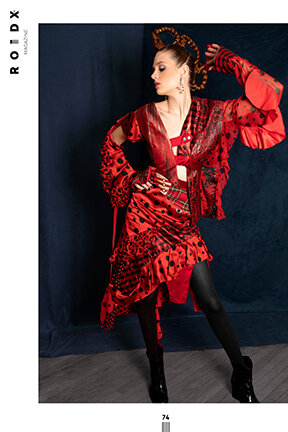
Using Cinefoil to create moody light reflections. This black matte foil, almost like tin foil, can be flexible and shaped into a variety of ways. I took a large piece and cut strips into it. I attached the large piece to a C-stand and arranged my strobe light behind it. My thought process was to create window shade type lighting. However, since Cinefoil is flexible, I mangled the strips to be bent in different ways. Wavy or straight, I was seeking a moody light wave effect. With the model in place, I moved the cinefoil around to where I felt it was most dramatic. Here is the result:


2. Getting down on the ground-listen to your instincts. For fashion photography, unusual body angles are the norm. I move around my models and change my body height often. However, I thought about getting low on the ground and having my model on the floor with me. Granted, this is not a groundbreaking way of photography. For me, it was going with my instincts and guiding my model to follow me along this journey. My model was keen to play along and was in total character for this set up.
We performed a number of hands in front, hands over head and hands close to the face. We had such a great rhythm of “dancing” on the floor together to create amazing images that were not planned.

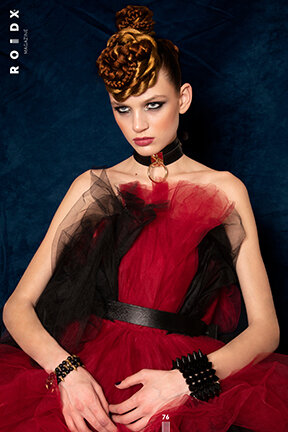
3.Pairing your images to move your editorial. While retouching mode, I was noticing the editorial needed a boost. I do a few rounds of editing and layout all of the images on my screen before sending out to any magazine. While I was reviewing the outfits, mood, coloring, retouching and overall feel of the work, I decided to pair my edgy look with a softer look. Nothing new in the photography world these days. I was seeking a balance and telling a story with one look. The specific hairstyle, coupled with glamorous makeup and a punk rocker dress, we were able to present different sides of this model’s character.
4. Body language can say so much. Each photographer and project will have a number of similarities and differences. I find each fashion or beauty shoot has small and big differences. Some photographers have their models or subjects photographed in a particular body stance or language. I have been guilty of this myself. With this particular fashion editorial, I wanted to produce photographs with a variety of poses that also show different body language.

This look was bold. I asked myself what would be the opposite pose or body language? Sitting down and looking bored is what I came up with. My model went for it and it is stunning. How can you be bored with this hat on your hat?
The question of the model’s reaction is fantastic. I had the model lean in to me and hold the jacket lightly. I wanted her facial reaction to be the force of her emotions. The hairstyle, neck choker, red biker jacket and messy eye makeup all play a part in the overall look. For me, I usually do not photograph with the model’s chest out that much. But I was aiming for earnest and powerful with this look.

With this look, I wanted to combine tough and gentle. Holding the arms close to the chest is generally thought of as protective or closed off. But the model’s expression allows the viewer in. The softness of her expression and the strength of herself in these edgy accessories and flowy dress is stunning. I usually do not cross arms, crossed over a fabulous fashion look but this time I went with the model’s instinct.

In review, going with your instincts can be the gift you give yourself with your work. Bringing in new creative techniques and styles can be key to a new style or a new client. Or it can be a really great avenue for you to have some fun, while on set. You are a creative talent. Be creative.

Beauty Photography Shoot 101
What is Beauty Photography?
What exactly is beauty photography? Beauty photography can include images that focus on cosmetics trends, hairstyles, skincare or wellness, and fashion/accessory styling. The storytelling is usually from the waist up or shoulders to head. A series of hairstyle changes or makeup changes highlight the beauty photography series. Props can be used, with lighting expressed from simple to very creative. Most beauty photography shoots are indoors, with an occasional outdoor background in editorials and campaigns.
Definition.
Beauty photography is a more modern version of glamour-style portraiture. The objective of a beauty session is to reveal your inner and outer beauty, your presence, your femininity, and your personality while providing you with an experience like no other!

Glasses:Mercura Eyewear
My Love of Beauty Photography Shoots.
I have to admit, I am a big fan of beauty product photography and the beautiful fantasy it can create. I love beautiful photography with models so much. I want to tell stories, create fantasies, and be hired for another major beauty campaign! Yes, I admit it.
As a creative photographer, I can express ideas, stories, and trends in a very colorful way. I love the intimacy of beauty photography shoots. I also love makeup and hairstyling!
Skincare products and overall wellness are additional areas I have a big interest in. so let’s dive into one of my most recent beauty photography shoots.

Beginning of the Beauty Photography Shoot.
It is all about the Concept. What is the photography shoot about? What is the tone? The color palette for makeup? Hairstyles? Props or clothing or accessories if needed? What type of beauty dish will I need or a light modifier? Once I have this figured out, I create a mood board or concept board, with reference images. I select a team I feel will benefit from this concept or has an interest in being part of this. I choose a model that I feel can bring this concept to life and is expressive. Model selection is very important. Not all models like beauty photography shoots or are good at working with just their eyes and shoulders. Remember, beauty photography needs life behind the eyes to be exciting and captivating. Hands can be an effective way to add to a beauty photography shoot. Remember, hands and fingers should feel like they are feathers-light and airy. Not like a closed fist. Camera lens selection is SO important for beauty photography. Many photographers who love beauty photography, use a 100mm lens, or an 80mm lens. I would test them both out, to see what works for you.

Middle of the Beauty Photography Shoot.
It is the day of the photography shoot. Once the team is set up and the model has arrived, I go over the concept once again with the whole team. I usually have my strobe lights, background, and props set up the night before in my studio. During the photography shoot, I converse with my team on changes or tweaks we feel we should make. Lighting checks and makeup checks are done, when the model steps on set. Any changes are usually done at this point. Once the first “look” is completed, the model steps into hair/makeup for the next “look”. We proceed throughout the time I have planned to photograph the mood, essence, and creative ideas of the team. Music throughout the photoshoot helps keep spirits high and your model engaged. There are times when the model can get bored or check out, mentally. As the photographer and main person in charge, you will have to keep an eye on this. Your interpersonal skills will come into play, with this situation. Keep spirits high and the atmosphere fun. Also, have a firm grasp on the run of the show. You are in charge if it is one of your photoshoots. Lead the team, with kindness and firmness. Bring your joy, creative vision, and skillset to your photography shoot.
End of the Beauty Photography Shoot.
Time for editing and retouching. Editing can be a tough Nugent with your work. You can be too close to your work and maybe not see the full potential of the entire shoot. This has happened to me and it is not necessarily the worst thing to occur. It happens. I like to wait a day or two before any editing. When I begin to edit, I do a few run-throughs. I highlight my first reactions in Lightroom. I then go back to each “look” and open up a few selections in photoshop. I photograph in the RAW format, so the files are huge. It is a better spectrum of color and for retouching to have a RAW file. I narrow down my selects to 1-2 images for each “look”. The client may like a certain type of look, while your makeup artist may want a different type of look.

I try to pick one image, per “look” but sometimes you have more than one. I will retouch more than one image if I feel the image can be used in different ways or the talent needs it to showcase their skill set. I use an outside retoucher for most of my beauty photography shoots. Why? These beauty retouchers are more skilled with skin retouch than I am. Skin texture is HUGE for beauty photography. Huge in what way? You, as the creative, have to keep up with trends and styles. Having a model’s skin that appears normal but refined is key. I hire outside help to make the result easier for me. I usually retouch small details that are easier for me to do-like pupils, hair flyaways, shading, and toning. You can retouch however you like. This is my process I want to share with you!

Let's talk Catchlights!

Catchlights. What are they?
Catchlight, by definition, is a light source that causes a specular highlight in a subject's eye in an image. They are also referred to as eye lights or Obies, the latter a reference to Merle Oberon, who was frequently lit using this technique. A catchlight may be an artifact of the lighting method or have been purposely engineered to add a glint of "spark" to a subject's eye during photography. This technique is useful in both still and motion picture photography. Adding a catchlight can help draw attention to the subject's eyes, which may otherwise get lost among other elements in the scene.
A catch light is not the same as the red-eye effect; in general, red-eye is an undesired effect (caused by the reflection of light from the retina inside the back of the eyeball), while catchlights are often aesthetically desirable, and produced by light reflecting from the cornea. Especially in portraiture, eyes without catchlights are often said to appear dull or lifeless. Lighting is often arranged in-studio portraits specifically to create attractive catchlights.
As a specific light source, a catch light is usually fairly dim or focused, as to not affect any other part of the scene or face. Many other lighting methods, however, are known for the distinctive or unique catch light they produce. Among those methods are ring lights, which produce several highlights in a ring, and large softboxes, which produce large, square highlights. While catchlights most often appear to be simply bright spots, as reflections of the surroundings they can contain entire images.
When I was a young child, I thought we all had catchlights, all the time. I learned catchlights were something added by sunlight or artificial light, by the time I was in junior high. I loved pouring over magazines and was fascinated with catchlights and how to achieve them.
Do you remember the first time you noticed a catchlight, in someone's eye?

Let's go over how to create a catchlight.
First, you should:
Find your light source.
In any photo shoot…whether professional, hobbyist,
Where is your light coming from? Look around.
Are you outside? Are you in the open shade? Are you inside? Where is your light coming from?
Open Shade:
Light source: sun, filtered by the shade of the walkway.
Open Sky:
Light source: sun, filtered by the distance of the sun in the evening light.
Window or door:
Light source: Photo taken inside, facing the window.
Electronic:
Flash: Taken in a photo studio, indoor, or outdoor space.
Light source: electronic or continuance artificial lights
If photography is without artificial lights, turn your subject to face your light source. Look into their eyes to see where the catch light is reflecting in your subject’s eyes. Move or tilt the subject's face or body to where you feel the catchlights have the look you want.
With an artificial light source, how high and how far to the right or left will affect the catchlights in the eyes of your subject. I find that having the light source at a 45-degree angle, pointing down towards the forehead of the subject creates a nice catchlight. It takes practice and talking to your subject as to where the catchlight should and will fall.

Be careful with any light source that is going directly into someone's eye. Some people are very sensitive to light, while others may not have a problem. Ask your subject, before any photography if there is an issue that you would have to be made aware of.
In post-production, you can create your catchlight. Many photographers feel the catchlight has to be in a certain position in the pupil. I do not agree with that train of thought. You can experiment and find what you like best. Some photographers do not clean up their catchlights in postproduction. Again, I feel this is a personal choice. Try different techniques to create the look you feel, works best for you.

Best Lighting for Portraits.
The portrait is one of the most personal and revealing subjects you may photograph as a photographer or any creative. Portrait photography, or portraiture, is a type of photography aimed toward capturing the personality of a person or group of people by using effective lighting, backdrops, and poses. A portrait photograph may be artistic or clinical. You can always be a part of the picture without showing your face. Alternatively, you can take a photo of your hands holding an item.
Questions to ask yourself and your client.
Once you decide on what you want to reveal in your portraiture work or what your subject expresses their wishes to you, you can now create your amazing portrait photographs. Do you want to include a full body image of your subject or maybe props/lifestyle setting to reveal your subject’s personality? Do you just include head and shoulders? These are important questions to ask before your photography shoot.
I always ask my clients if they have a reference image to send to me. Sometimes clients do not express exactly what they desire, verbally. An image or set of images to use as a reference is always a safe bet that there will be harmony on your photography set.
Side Note. Remember that camera lens glass, coupled with new technology for photography creation in your camera body, is much better than years ago. That means your subject will be sharper. Facial lines, acne or scarring, or other facial issues may have your subjects feel uneasy in front of you. You want to make your subjects feel comfortable and relaxed. You also want to use lighting that is softer than harsh light. Most photography is retouched to some degree these days. Use a retoucher or technique that is satisfying to your client. It will go a long way to have a retouching conversation before any photography.
Where to start, in terms, of lighting? Let’s dive in.
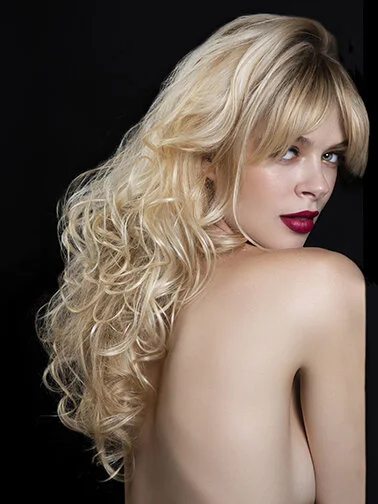
1.Natural Light. Natural light can be the most amazing light for any portrait. Even on a grey, overcast day, natural light works so well with any skin tone. Depending on the time of year, your location, and the time of day, natural light can be tricky as much as it can be flattering. Natural light sometimes has color tones that you may have to deal with in post-production. If your subject has deep-set eyes, natural light can make your subject’s eye appear to be black holes. Natural light can be dramatic, with shadows from trees or buildings or natural light can be harsh with sharp shadows on the face, as a summertime session at high noon.
Study the color of light, photograph different examples, and try your various color settings with your camera.


My Subject’s eyes seem sunken in with the natural light that is not very bright. It was important to keep the subject as natural as possible, in the natural setting. I did use photoshop to opening up the eye’s exposure.

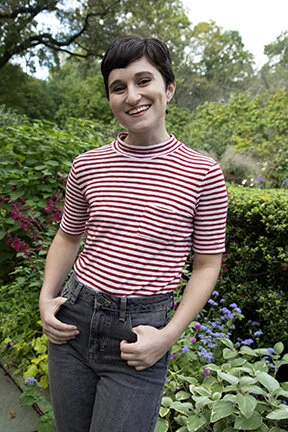
With this portrait, I took advantage of the bright sun coming through the clouds and creating a sharp shadow for the far side of the face, to add drama. My subject and talked about the mid day harsh lighting and how it would be dramatic on her face. We did a few test images before the final pose.
A reflector works wonders when photographing outdoors. Aim the reflector towards the areas you need more light in. Sometimes, I use a Speedlight for extra fill light. More on that later.
2. Continuous or Constant Lighting.
This means that when you turn the studio lights on, they stay on – like a video light or a flashlight. You can power them up or down, based on what you need, but they produce what you see is what you get lighting.
Continuous lighting has made great strides in the quality of light, affordability, and light strength. You want to use continuous lighting that is daylight balanced and has a lot of power and strength. I have had a few subjects tell me they prefer constant light over strobe lighting. The constant light does not make them jumpy or flinch. Not all subjects are comfortable with the constant flashing of strobe lighting. With constant lighting, you can see how the light will fall on your subject and modifier accordingly.


Both of these portraits were created with continuous lighting. While the light is on the flat side, it is still very even and pleasant. I moved the light closer to the subject, for the image on the right, and the light-filled her face and the light fall off from the neck down.
3. Strobe Lighting.
A strobe light or stroboscopic lamp, commonly called a strobe, is a device used to produce regular flashes of light. The light source is commonly a xenon flash lamp, or flash tube, which has a complex spectrum and a color temperature of approximately 5,600 kelvins. To obtain colored light, colored gels may be used.

I love working with strobe lighting with most of my work. It is crisp, sharp, flattering, and soft, depending on the modifier you use. Strobe lighting is easy to adjust and shape.
With a range of brands for you to choose from, the use is pretty much the same. There are different modifiers to utilize and different brands to mix to adjust your strobe light.
Depending on where the strobe light is: above, to the side or in front, the light quality is sharp and powerful. Shadows are controlled by modifiers and space between the light itself and the subject. Shadows can be deep or softened. Movement is easily photographed with strobe lighting.
With each type of light, you will have to decide which type of light to use: hard light, soft light, specular, and diffused light. Soft light comes from a light source that is large relative to the subject, whereas hard light from one that is small relative to the subject.
Specular light is a light that retains its reflective qualities. When this light hits a subject, the reflective light bounces back into the camera. The diffuse light is observed when the projected shadow of the subject has blurred edges: this is called a soft shadow. The contrast is also less pronounced, with differences more subtle between bright and dark tones. Example, the soft shadows on the face, closest to the grass. The face and top retain their light reflective quality. Light source is the sun, during summer season.

Tune in next time when I discuss light modifiers and light shaping!

How do you put together a test photography shoot?
How do you put together a test photography shoot?
I’m Lisa Ramsay. I am a commercial freelance photographer who lives and works in the New York City Tri-State area. I have been asked this question many times. There are different outlets or avenues you can utilize to produce your creative project. There are no set rules for a test photography shoot. Treating your team and your photoshoot like any other “business” photoshoot will help you tremendously.
Let’s dive in and discuss the many elements that go into a test photography shoot.

The photographer is the Captain of the Ship (your photoshoot). Yes, you are the one in charge. Most test photoshoots are organized by the photographer. You set the tone of the entire photoshoot. While your team members may bring their ideas to the project or may want to add another element to the photography shoot, at the end of the day, you are the person who makes the final decision. Some photographers are very strict with their test photoshoots. They want everything done to their specifications or desires. I run a democratic test photography shoot. However, I make the final decisions. The creative talents I have on the shoot want direction and may have questions. I want my team to feel they have input and their opinions/skills/experience mean something to me. I want to hear their voice. Remember, at the end of the day or when submitting an editorial, YOU will be held responsible for all decisions that occur
2. Concept or Mood Board. Who creates this? Most of the time, I create the concept board or mood board. Many fashion stylists are skilled with this. Discuss this with your stylist, if you will have one. Make sure to include reference images for posing, hair, makeup, and any other important factors. Location, time frame, and the purpose of the shoot also go into your document. Model information and photos are very helpful to your team.

3. Who requests the pull letter from a magazine or publication? This can be the photographer or the fashion stylist if you have one.
4. Starting the test photoshoot. Your preparation is key to your success. Are you choosing an outdoor location or an indoor space? Will there be easy access to a restroom or changing? Where will you stage hair and makeup prior to the photoshoot? How much time are you allowing for hair, makeup, and any styling prior to any photography? Once everyone arrives at your test photoshoot, let them set up and get themselves comfortable. Be open, friendly, and encouraging with your team. Have a pre-production meeting or talk with the team about the photo shoot plan. Be very clear with behind the scenes photos and videos. Most magazine submissions or client work do not want to see anything prior to publication of finished work. Keep the BTS creation to a minimum. I say this so your test shoot does not drag on or that the model gives your creative team more energy than with you. I say this because it has happened on multiple photoshoots of mine. I now keep BTS creation to another photographer or to a very short time frame.

5. Be open to the ideas of the hair/makeup people. My creative teams have a vision and a skill set that I appreciate. Sometimes they see things or areas of improvement that you may not see, due to other things going on. Even if you do not like their ideas, it is generally a good idea to listen to what the team has to say.
6. If there are expenses like flowers, etc, who pays? Usually, the photographer pays for expenses like flowers. I would discuss this type of expense with your team. Locations, photo studios, lunch, travel are all items that the photographer usually pays for the whole team. You may have a team that pitches in and you may not. I would be very clear, from the start, if any fees to the team will be paid. Are there expenses like shipping or travel that need to be covered by the person who is putting the test photoshoot together?
7. Who hires the model? The photographer hires the model. Even if another member of the team is the organizer of the test photoshoot, the photographer has the last voice for model selection. I like to send model packages to the fashion stylist (if one is on your test photoshoot) so I can get feedback on my original choice. What you look for in a model will make or break your test shoot. Is the model a chameleon? Does the model move well? Does the model have a strong sense of confidence? Whatever your deciding factor is, your decision for model selection will be a big part of your success or failure.
Relationships with modeling agencies are like any other business relationship. Ask questions as to what is expected after the photography shoot. Be clear and honest with any model agent.

8. Who hires hair/makeup talent? If the photographer is putting together the test photoshoot, then the photographer hires the hairstylist and makeup artist. If the stylist puts the test photoshoot together, then they should hire the HMUA team.

9. Who gets the permit? The photographer generally applies for the permit.
10. After the photoshoot, who edits the editorial? The photographer will be the person selecting the images for your editorial. Sometimes, I will include an extra beauty image for the hairstylist or makeup person. A close-up or different angle for their portfolios. This is totally up to you. Retouching is done by the photographer or sent out to a retoucher.
11. Who sends the final images to publications? Generally, it is the photographer. Sometimes the fashion stylist may do this. The fashion stylist will have to provide a list of all clothing and accessory credits.

12. Why did I not receive any photos? Not every test photoshoot will be published in a magazine or client.If your test photoshoot was for portfolio building, you should receive finalized photographs. Honest communication with the photographer is essential. I know of test photoshoots where the photographer hated the outcome and did nothing with the images. Meaning, the team did not receive anything. This is an unfortunate situation. If this happens, I would be very frank and honest with my team. I would try to pull something from a failed photo shoot. However, sometimes it does happen that nothing is good. I would be honest with your team and try to offer another shoot to the team to make up for a failed photoshoot.
If you have any questions, please feel free to contact me via my website, https://www.lisaramsay.com.
all images ©LisaRamsay

Stun Me
Mishaps, miscommunications and human error can happen on any photo shoot. I want to share my experiences so they can be avoided in your future photo or video shoot.
When I was a young child, I thought about becoming a comic! My sisters and I would create live plays to perform for our neighbors. The plays or shorts as we called them, had a funny bend to them. The stories or ideas ranged from family life to what it would be like as an adult. We even had an annual Halloween play with sound effects and decorations. I was asked, by a student in one of my workshops, what was the funniest occurrence on a job. Here is a small selection of those funny moments. Short prose that will hopefully make you smile.
Mishaps, miscommunications, and human error can happen on any photoshoot. I want to share my experiences so they can be avoided in your future photo or video shoot.
Always make sure your creative team understands your directions-to the “T”. I had a hairstylist take over a bathroom, in a hotel room, for over an hour creating a hair look I did not ask for. When the model emerged with super kinky huge hair, I did not know what to say or do. Time was not on my side. After taking the hairstylist aside and explaining the hair was not what I wanted and did not want for the second model, I started to shoot. My make-up artist and I pulled the model’s super kinky frizzy hair back and created a new look. I later changed the model’s hair in photoshop.
Use a tone of voice that is strong and calm. I had a celebrity fashion shoot. The celebrity was attended by her mother and publicist. While shooting the celebrity, tethered to my laptop, my assistant caught my eye. He made a gesture to look at the laptop, which was behind me. The publicist was taking photos with her camera as they were coming up on the laptop. I gently put my camera down and addressed the publicist. Me- “What are you doing? You can not be doing that while I am shooting.” Publicist-”I just want to make sure I have something as a reference. I won’t use them”. Me-” If you keep photographing my images on the laptop, I will stop the photoshoot”. The publicist stopped taking photos and the photoshoot continued.
Sometimes you need to call the model booker. I had an outdoor fashion shoot last summer in my local park. I had included in my reference photos and photoshoot description to the whole creative team and modeling agency that we would be shooting bathing suits. The model we booked was very opinionated and offended everyone on the team except for me and the make-up artist. The creative team was not happy and felt like their work was not appreciated. When it came time to photograph the bathing suits, the model refused. She told us she talked it over with the booker the day before and didn’t have to wear them. While the model was getting her make-up changed, I went to a quiet place and called the booker. I explained what was happening and that the bathing suits were not only essential to the editorial but agreed upon prior to shoot. Booker agreed and said to give him 15 minutes to call the model. I pulled the model aside and had the only conversation I ever had with a model that her behavior and attitude stank. And that I called her booker who was not happy with her either. The model spoke with a booker. Bathing suits were photographed for editorial, which was the opening page to editorial.
How to avoid your make-up artist from going crazy. I had a location fashion shoot with two models. One model did not like the make-up that was done for the editorial. The model wiped off the lip and eye color and reapplied the make-up to her liking with her own make-up. While photographing the other model, the make-up pulled me aside, told me what happened, and threatened to quit the shoot. I finished photographing the other model. After calming down the make-up artist, I found the other model in another area. With the make-up artist at my side, I explained to the model that the make-up artist was in charge of the make-up and she would have to sit through another round of make-up changes that I wanted. The model agreed and we finished photographing the editorial.
Do your homework before a photoshoot or workshop. I recently taught a photography workshop for Manhattanhenge, where the sun descends in alignment with certain streets in Manhattan. My workshop was in a Long Island City park. I followed the directions given to me, from the school founder, but did not do my own research as to where exactly we should be standing in this park. I gather up the students together, form a group, and give the students lecture. As we were waiting for the sunset, a few students asked if we were in the right spot. I assured them we were in the right location. After some research on their cellphones, one of the students realized we were in the wrong place! With little time to spare, I moved the students, with their cameras and tripods to the correct location. One of the students had some stern words that I should have known where to go from the start, since they paid for the workshop. I apologized and said I would do my homework next time.

Editorial Fashion Photography
What is Editorial Fashion Photography?
In editorial photography, fashion, accessories or beauty products can become an illustrative means to tell a concept or product.
I love to have a conceptual theme or visureal experience with movement with my editorial photography shoots.
Editorial Photography sells a story or an idea. Let’s take a look further!
Difference of Style:
Commercial and Fashion photography shoots try to sell a certain product, while Editorial Photography is more concerned with a story. Fashion Photography does not always have an emphasis on the garments, but the mood and styling of the image. The garments are merely an accessory to convey a certain lifestyle. Therefore, the whole image is much more complex. With the increased complexity in styling also comes an increased complexity in lighting to make the image look more dramatic.

Editorial Styling
Elements:
I learned about the complexities, hardwork and drive to create a successful editorial fashion photography shoot while I worked in the photography studio at Fairchild Publications. Orchestrating the talent to perform on time, create an atmosphere of joy, and turn in a body of work that reflected the editor’s desires was paramount. I took those important elements into my own editorial fashion photography shoots, with added flavors and concepts I thought were important.
My skills at telling a visual story have improved over time. There are many factors that come into play before, during, and after an editorial fashion photography shoot. To have your ideas or concepts solid before any shooting, mood boards, run of the show, and strong communication with your team is highly recommended. Narrative, flow, editing, layout are a few key elements to a successful editorial.

Elements of Editorial Photography
Lighting:
Lighting for Editorial Fashion Photography varies from photographer to photographer. When I photograph a fashion shoot, I have used up to 4 lights to get the dramatic look that I wanted, but I know photographers who use ten or more lights for fashion. That is not to say that a dramatic look can not be achieved with only one light, such as a beauty dish or an octa bank. It's about the effect of the lighting and not about how many lights you use to get that effect.
As a photographer, your lens choice can make a difference in your fashion images. Editorial photography can be a combination of poses, framing and focus. Your color toning, background shade and common thread idea are a few things to keep your editorial exciting.

Lighting Samples in Editorial Photography
Beauty:
Does Beauty Editorial Photography fall into the same category? I believe so. Beauty Editorial Photography shoots have evolved tremendously over the last few years. With the growth in the cosmetics, skincare, and wellness businesses, beauty has taken on whole new importance in editorial photography. Beauty shoots can be very stylized with fashion pieces and accessories. Beauty shoots can also be all about cheek color, eyelid color, or any imaginable point of focus.
I love beauty editorial photoshoots that have a fashion element to them. I also love a beauty editorial shoot that just focuses on cosmetics or skin care or hairstyles.

Beauty Editorial Photography
Examples of Editorial Fashion Photography use include:
Advertising in print and digital media campaigns
Marketing and promotional materials
Corporate presentations and brochures
Commercial websites
Product packaging
Film and television
Books and book covers
Newspaper and magazine articles
Editorial features
Blog or website (for descriptive purposes)
Commercial Photography sells a product.
Fashion Photography sells a lifestyle.
Editorial Photography sells a story.
You can combine all three for your next Editorial Fashion Photography shoot.
What will you photograph for your next Editorial shoot?

5 Tips for Natural Lighting in Photography
Light is the most important element in any photograph, sometimes the reason for the photograph. The ordinary can be made beautiful, in the right light. To master natural light, start looking at light, thinking about it. So let’s dive in and talk about natural light in photography.
5 Tips for Natural Lighting.
Light is the most important element in any photograph, sometimes the reason for the photograph. The ordinary can be made beautiful, in the right light. To master natural light, start looking at light at different times of the day and year. Start thinking about the light and the qualities of natural light. So let’s dive in and talk about natural light in photography. All of the images have not been retouched or altered.©LisaRamsay.

Morning Fall Light
Photography lighting tip number one: Choose the time of day to photograph.
It can make a difference between an average photograph and a great photograph. Early morning and mid-late evening light is almost always the best time to photograph landscapes and any outdoor scenes. Midday natural light can be very harsh, with deep shadows and extreme brightness. Your highlight and shadow details could be extreme with blown-out highlights or no detailed shadows. This can be a recipe for image exposures that could be unpleasant. This photography’s morning light was very bright. The shadows are deep, with little details. The mid-tones are pleasant. The highlights are a little on the hot side, but just a small fraction. My intention was the create an image with details in the mid-tones so the viewer can see the reflections in the water.

Afternoon Side Light, Early Summer
Photography lighting tip number two: Weather and Time of Year are important too.
Natural light has different tonal values and colors depending on the weather and time of year. Summer natural light is usually stronger and brighter than winter natural light. If it is rainy or overcast, the natural light will usually be mixed with precipitation elements and be different color tones. Softly lit cloudy days can be very appealing with skin tones. The side light happened because the sun was going down. It was important to me to photograph this scene with light streaming from one side. The afternoon natural light is flattering. The viewer can see details in the shadows. The mid-range tones are vibrant and flat, as are the highlights. The shadow detail was very important, so your eye looks from one end of the image to the other end.

Flat Afternoon Light in Spring

High Contrast, Midday Light
Photography lighting tip number three: The Direction of Light.
The quality and direction of natural light are very important. Sidelight illuminates your subject from the side. Late day and early morning side light can be very beautiful for your subject. The backlight comes from behind your subject. When used properly, this can be the most interesting type of light. It is tricky at times. It took me time to master this, with many exposures to get the effect I wanted. Soft light is a very low light before sunrise. Rainy or snowy days usually have soft light. Top light comes from overhead. Summertime midday light or tropical sun falls into this category. Flat light happens in cooler, winter months, and regions. It can be dramatic with evening cityscapes and streets because the electric lights are pronounced with flat light. For the photograph with the single tree, the harsh summer light was coming from directly above. I have no shadow detail and my mid-tones feel little burned. However, I liked that aspect. I like I have cloud detail and grass detail, even if it feels burned. The pond photograph was created in the flat afternoon light. It feels muddy and mushy. Which is what I wanted to convey. I like the water reflections and the rolling clouds in the sky.

Available Light, Dusk
Photography lighting tip number four: Available Light.
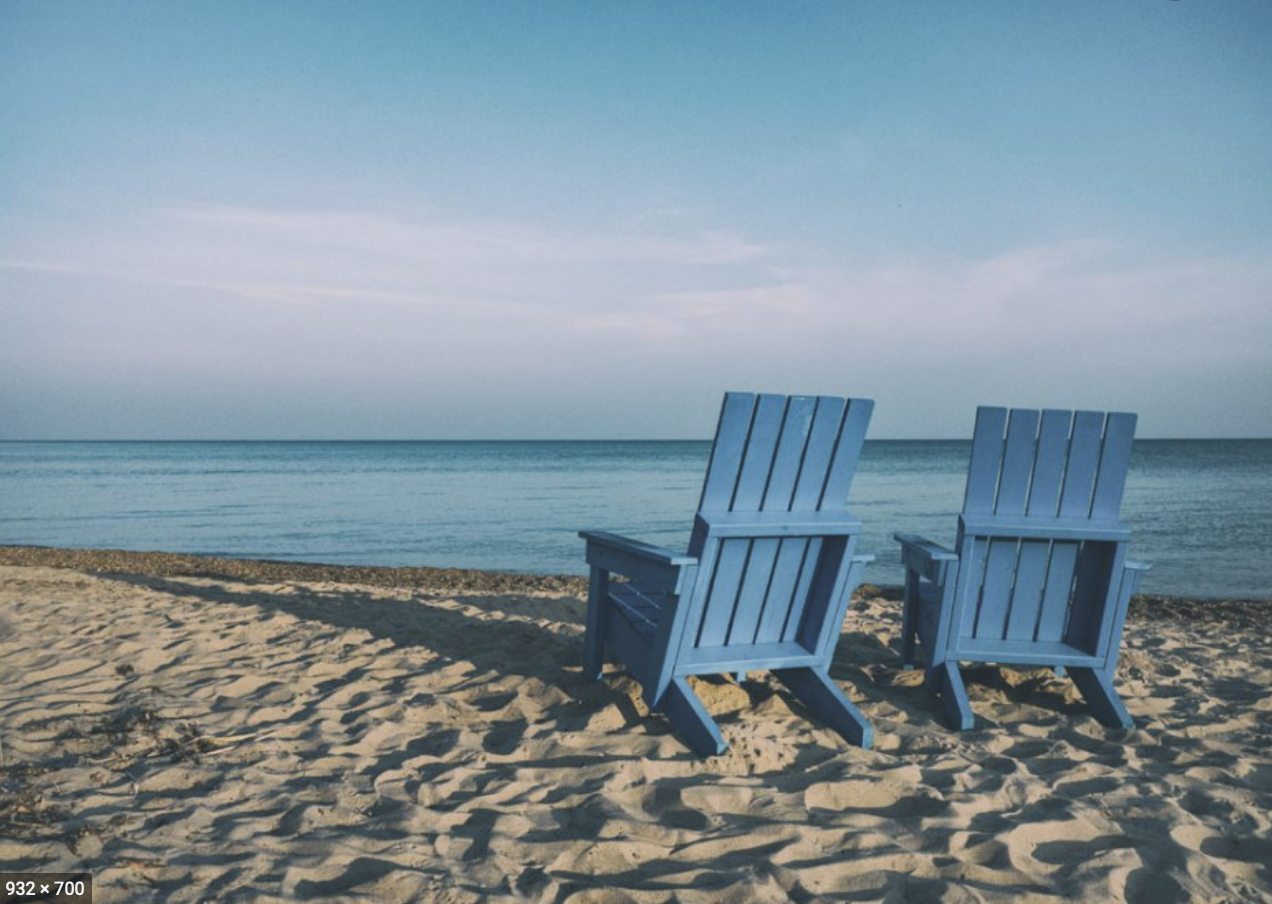
This is the term for existing light from lamps, any kind of street lights, stadiums, stores, offices, schools, etc. You can create wonderful images with just available light or a mix of available/natural light. Available light is usually low light. This means you would need a tripod or have your camera steady with a low ASA/ISO. Most DSLR cameras have a high ASA/ISO numbers so you can also photograph in available light. Waiting and watching the natural light can create amazing work. I was looking out the window for about an hour, waiting for the sunset to be in the spot right behind the tall tower. Natural lighting during sunset hours can change very quickly. Take a few more images than normal if the light moves at lightning speed.
Photography lighting tip number five: The Color of Light.
Let’s take a look at Color Temperature. It is very easy to comprehend with some practice. Color temperature describes how cool or warm the light source appears. For example, incandescent lamps have a warmer, more reddish appearance than colder, bluer HMI lamps. Color Temperature is expressed in degrees Kelvin (K). Daylight on a clear day is about 6500° Kelvin—a mix of direct sun at 5500°K and skylight at 9500°K. Lights with lower color temperatures look red; those with higher color temperatures look blue. This chart is easy to follow. Spend time exploring your light settings on your camera. Create your photographs at different times of the day and with different weather scenes.
These photography lighting tips are just a starting point for your natural light photography. Natural light can be the most beautiful type of light. Understanding all of the aspects and challenges of natural light is necessary for your photography success.

Directing and Posing your Subjects 5 Easy Steps!
5 Easy Tips for Directing and Posing your Subjects.
1. Speak with an even-toned voice. No one wants to be yelled at during a photography or videography shoot. Speak with an even-toned voice when talking and directing your model or subject.

2. Show your model the pose you desire. You can go into pose yourself and give your model a live example of what you want. Have image examples on hand so you can reference a pose to your model

3. Be patient. Directing models or people can be frustrating. Everyone will be looking to you for guidance and direction but also looking to you as to the mood in the visuals. If you let your frustration show, the whole mood of the shoot can head south.
4. Create imagery from different heights. Take advantage of your shooting space. Move around for different angles. That also helps your subject in giving you a variety of poses. with videography, having a second camera source (a cellphone or GoPro, if another camera is not available) that produces another point of view. This will round out your video and make it more engaging.

5. Talk to your subject. Your subject will look to you for guidance. Talk to your subject often. Have them role-play. Ask them questions or tell a story. The more they are relaxed, the more they will perform in posing.


The Creative Portfolio
Definition of a portfolio: a large, thin flat case for loose sheets of paper such as drawings or maps. For photographers, a portfolio is a collection of visual work (still or video) that exhibits your efforts, progress, and skills in one or more areas of photography. In today’s world, our creative portfolio can be online with websites and various social media apps (Instagram, Facebook, LinkedIn etc), in addition to having a printed portfolio.
Your Calling Card: Your portfolio is your calling card to the world. There are many options to create an exciting body of work. What do you include or how you layout your images can make a big difference in your portfolio’s impact on your viewer. Where and how do you start to create your portfolio? Firstly, define your audience. Secondly, develop your style for that specific audience and your creative vision.
Subject matter is key, not just for your work but also for your viewer. Thirdly, photograph, and create more work, then repeat. Give yourself self assignments that can express a narrative or clear idea in 10 images or 20 images. Write down ideas that interest you or an outline of the visual story you want to explore. Try different points of view or use different pre-sets (if you use those) or try different lighting situations. Ask for advice on your work during these self assignments. Does the body of work make sense? Do you have to photograph more, to express your ideas more thoroughly? Having an outside voice that can provide constructive criticism will be a big help. If you do not know someone, ask someone that you admire or join a group of other visual artists whose work you respect.
Themes. You can present a singular or multiple themes in one portfolio. There are marketing professionals that will suggest that your business should be a niche so a prospective client will not be confused when viewing your portfolio (if you have a variety of subjects or genres on your website). I feel this will vary from photographer to photographer. Certain regions in the United States are more populated than others. You may have to photograph a variety of subjects or genres to survive. Or you may like to photograph different types of subjects or scenes. I would put your best work in different portfolios, on your website. Keep the number of images in each portfolio to a minimum. You have to tell your audience what they are looking at or what you are about. Include a short description of your work in each portfolio on your website.
Include a page to verbal express your self and you're creative process to your viewer. Be sure to include your name, phone number and any other contact information easily seen and accessible. Hire Me buttons are very useful, as is a contact form. Editing: Editing is key to a strong portfolio. We are sometimes too close to our work. Have another set of eyes review your choices before publishing your website or creating final prints. Also take advantage of free portfolio reviews from trusted individuals. I have my website portfolio reviewed a few times a year by marketing professionals. Their input is valuable and has helped me move forward with my own business.
Flow. What is it and why is it so important? Flow is the way your eye moves or is led through a composition or portfolio. I use the analogy that your portfolio or website should read like a roller coaster. You want to start with an eye-catching image. You also want an equally exciting images as your last image. Throughout your website, you want the viewer to feel like they are going on a visual roller coaster, with highs and lows of static and powerful work. You want your portfolio to have a common thread that connects all of the images on your website or in each portfolio section.
Layout of Your Portfolio: Decide if you want a vertical or landscape portfolio. Merging the two formats can be done, in one portfolio. Your layout has to be flattering and be consistent throughout the whole portfolio. Spacing around the images, at the border of the page, are important decisions that can make or break your portfolio’s impact. View another portfolio to get a sense of layout options, if you are not sure which way to go. Your portfolio will change over time, just like your photography work. You want to present your best images, at all times. Which website company you choose is a personal choice. If you want to print your portfolio, research printing companies before printing a whole book. A printed portfolio or set of postcards can be pricey.
Presentation: How many images to include in your portfolio? That is a personal choice but keep your portfolio tight. Title of your portfolios with concise titles. Keep yourself up to date with what is going on within the industry you are interested in. Look at magazines, books, websites on design and layouts. Read blogs or follow those companies or individuals that you feel can help you or give you good advice on Linkedin or other industry websites.
Something Else: I make small prints of my portfolio pieces and lay them out on the floor or table. I move them around to see how the images flow from start to finish. You can do this on your computer as well. You want to create excitement, a continuous flow of interest and strength within each body of work. Your portfolio can include more than one subject matter. Find images of various subject matters that can speak to each other when placed next to each other to lead the audience from subject to subject.


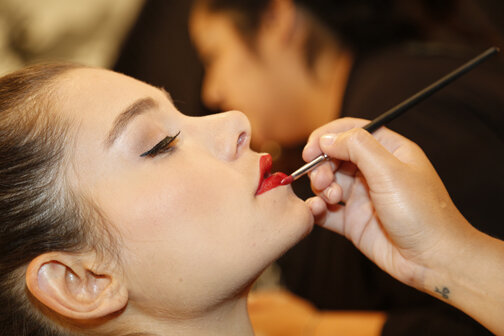
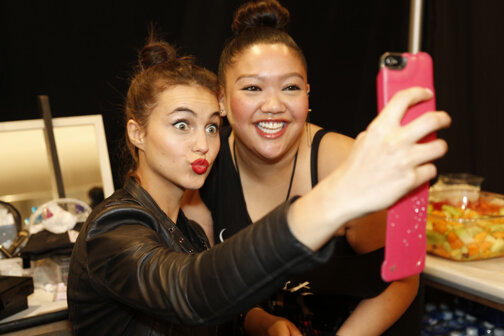
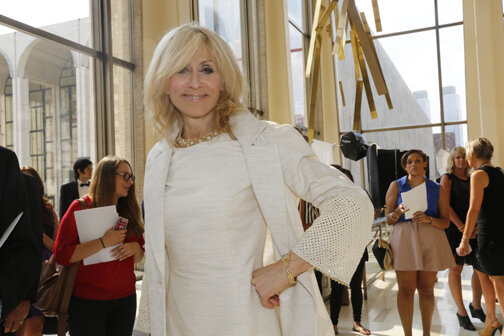
New York Fashion Week.
Recently I had a telephone conversation with a friend and former colleague. We were having a lively conversation regarding an Italian fashion photographer, who recently passed away, who we both worked with, side by side with during New York Fashion Week. While we exchanged stories involving this larger than life individual, we reimeinsted about our own personal history with photographing fashion shows at New York Fashion Week. Here is a small part of my story.
Recently I had a telephone conversation with a friend and former colleague. We were having a lively conversation regarding an Italian fashion photographer, who recently passed away, who we both worked with, side by side with during New York Fashion Week. While we exchanged stories involving this larger than life individual, we regimented about our personal history with photographing fashion shows at New York Fashion Week. Here is a small part of my story. I realize not everyone is interested in fashion week or fashion as a whole. Looking back at these memories of my life experiences are certainly keys to my professional and personal successes.
I was hired to work in the photography studio, at Fairchild Publications in August of 1990, as the coordinator of the photography department. I was a kid, at 22 years old when I joined Fairchild Publications. I had a long love of photography, even at that young age. My photography work experience, at that time, was working in my high school darkroom and photography studio. I knew nothing about fashion and the fashion world. Do not cue up “The Devil Wears Prada” just yet. I read fashion magazines before my employment at Fairchild Publications. However, I did not live the fashion life.
With the help and guidance of the editors, advertising sales personnel, and my colleagues, I learned all about the fashion business, from the ground up. What thread, fabric and button choice a designer made could make or break a whole line. What model or creative visual decision could make or break a brand or story? How do you interpret an editor’s written story while being creative and true to the publication you are working for? I encountered and learned so much on this job. It was one of the best educations I ever could have received.
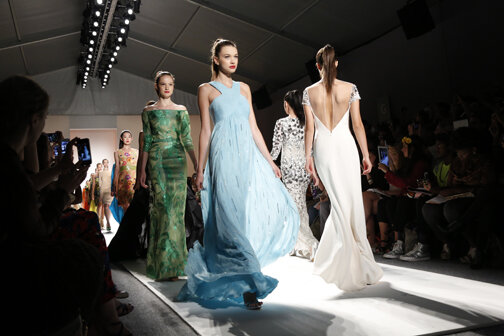
New York Fashion Week is produced twice a year. I sat back, in the office, for my first year at Fairchild Publications. Come September of the following year, I was able to help the guys and girls on staff, at the fashion show locations. Fashion Week Shows and presentations were held in hotels, empty spaces, landmark buildings, showrooms or any other place the designer felt told their story further. The shows and presentations were on a much smaller scale than they are now. I was a nobody, standing in place-holding a spot for the staff photographers, at these various New York City locations. I had no connections or relationships to the other photographers or press or designers. The foreigner press photographers who had been covering the world of fashion week, for many years, took me in, as one of their own.
Holding spots for the staff photographers was exhilarating and frustrating at the same time. Experiencing a new type of work experience was thrilling. I had the pleasure of meeting fashion designers( Louis Dell olio, Marc Jacobs, Ralph Lauren, Diane von Furstenberg), public relations person, editors, and many other people involved in the fashion world. I was excited and like a sponge-listening, learning and leaning into the world of commercial photography. It was frustrating because I wanted to photograph the shows and was not allowed at first. Some of the personalities of the pit crew photographers were abrasive, rude, and masochistic.
Tensions could be high right before the lights went down, at the start of a fashion show. Not having the spot or place in the crew pit that you wanted could be frustrating for you or your editor. We used film cameras in those days so your exposure was so critical. Running to the photo lab, editing the slide film, and keeping track of all of the film was an added responsibility to the job. I had one fashion show where I thought I lost a roll of film. Not only did I get yelled at by the main photographer, I had a bit of an anxiety breakdown. I did not lose the roll of film. It was deep in my bag at the time we were gathering the film for the film lab run. I never made that mistake again-losing track of the exposed film.
Over some time, the photographer staff and I created a rhythm with trust and expectation to support each other and to deliver the photography images needed for the publications we serviced. There were many times I waited in line, outdoors in the cold or rain, to be led in ahead of the line of photographers to wait for the staff photographers in the pit. Jocking for a space that provided a fantastic point of view was either a pain in the ass or easy. Pain in the ass was when someone else wanted your space, or made deals to move you or your team just because. I had to answer to my team. So I learned to be tough and not move at all. You need me to move? - f*** off, I would say out loud. Not moving. Yes, I created a bit of a reputation of a hard ass but I wanted the team to have the best spot for their photographs.
There were many times I was the photography assistant, loading camera bodies of film, squished tightly between a stranger’s legs and other body parts. Sometimes there were tears and stress because of the long hours and egos involved. Stress could also be from not capturing an outfit because of camera malfunction or film jam. Or maybe someone’s elbow jabbed you while the show was going on or someone dropped their spare camera on your back during the live show. Fashion week photography coverage could be front of house, meaning photographing the runway action or back of the house, where the HMUA & styling occurs. I always felt it was a privilege to see these beautiful garments up close and have a sense of unity amongst the creatives involved in composing a finished look.
Photographing backstage was calmer than in front of the house, usually. When it got closer to the actual show time, the small backstage area had more photographers and videographers creating their stories all at once. Many makeup artists or hairstylists were annoyed with our presence, crowding them in for our visual images. I tried to perform my job while not being a nuance. I did annoy a few creatives from time to time, with not moving out of their way quickly enough to get my photograph. In the end, we all understood we were there for a reason and not to take it personally.
I attended a large number of fashion shows and presentations while I worked for Fairchild publications and as a freelance photographer. One of my all-time favorite fashion week shows was Alexander McQueen’s New York show in 1996. I was the second photographer for that fashion show. The pageantry and performance of the entire show was something I had never seen before. Models flying high above you. Models walking through a pool of water. Models looking like creators of another universe. It was magnificent. I was caught looking over my camera a few times by my photography partner. The fashion show was so surreal. I did photograph all the outfits but I did not want to miss a moment. Watch the video of this show on Youtube if you can. It was a tough job fitting in a male dominant field.
While you were appreciated for your skill, sometimes your sex made some of the male photographers snarky and cruel. I was belittled early on, by another photographer, who felt I did not know enough about being a skilled photographer. While I felt wounded, my exterior showed no emotion. I got very good at deflection working in that pit crew. There were times of poor behavior amongst the crew pit of photographers. There were other times when we all worked as a unit. Making sure all in the pit had a clear view of their photographs and videos.
When I left Fairchild Publications and worked as a freelance photographer, one of my main employers was someone I met at the New York Fashion Shows. I worked many long hours with this new employer and loved every minute of it. I met many individuals, from all walks of life from fashion week. I also fostered those relationships I made from many years ago, when I was the newbie photography assistant. When I was contracted to photograph for a major sponsor for New York Fashion Week, it was the connections and photographers I have known, all those years, that helped me secure a space in front of the house to create amazing images for my client. I made many friendships and business connections from my time photographing New York Fashion Week.
Were there moments of outbursts and yelling? Yes there were. Were there fights amongst the pit crew? Yes, occasionally. Was it hard work? Yes it could be. Yes, there were also times of silliness and joy from photographing a fashion show where all involved were on the same page-shouting out funny jabs or comments at each other. Like any other business, there were fashion shows that were not great. Many fashion shows were super fun and full of joy. My experience is just that, my experience. Now, you can queue up “The Devil Wears Prada”.
Lisa Ramsay, Professional Photographer / Producer / Production Manager / PhotoArtDirector